
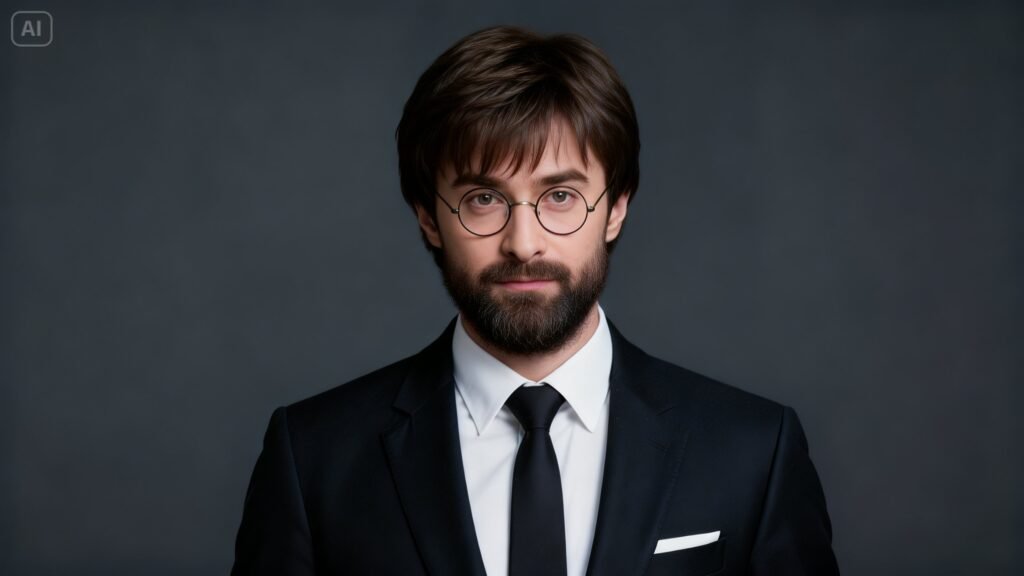
Have you ever wanted to see yourself with a beard without growing one first? For trying out a new style, making content for social media, or designing a character concept, it’s incredibly simple to try out realistic beard edits thanks to the power of AI.
Using the power of Dreamina’s AI avatar generator, you can instantly add an entire beard to a picture that looks natural and seamless, like an actual photograph. Not only will the edit be believable, but the process itself is fast and intuitive.
But let’s take a closer look at how to create a realistic beard edit.
Reasons for realistic beard editing
Simply adding a beard to your picture is not enough. You need to consider the texture and lighting, as well as ensure the whole picture looks natural.
This is why a bad edit may ruin the appearance while a good edit will improve it significantly.
Consider:
- The relationship between beard style and facial structure
- Coordination of hair orientation with natural hair growth
- Correct application of shadows and highlights
It’s the little things that matter when it comes to realism.
Top 7 tips for natural-looking beard editing
- Consider matching the beard to the face
Not all faces are compatible with all beard types. Whereas someone with a sharp jaw line might benefit from a structured beard, others could do well with fuller or more integrated styles.
Try out:
- A light stubble for minimal change
- Beards with medium length
- Full beards for radical change
The advantage of AI is the ability to test different styles instantaneously.
- Pay attention to hair texture and growth
Human beards vary greatly in hair structure, texture, and density.
When working with images:
- Make sure hair flows naturally
- Do not overstructure hair to the point of looking artificial
- Introduce minor variations into beard styling
This is one of the advantages of AI technology as opposed to traditional image editing.
- Lighting adjustment for seamless integration
It is essential to take into account the role of light in the editing process. The beard must correspond in terms of lighting to the original image.
Be aware of:
- Correct location of shadows under the chin
- Highlighting of thicker parts
- Uniformity of lighting
Even the most accurately modeled beard can lose its realism due to the wrong light distribution.
- Detailed edge work
The edges of the beard should not stand out. The beard must seamlessly merge into the skin.
Take note of:
- Soft but clean contours
- Blending near the cheeks and neck
- No rigid contours
Thus, the result will look realistic.
- AI tools for detailed editing
In today’s digital world, technology has evolved significantly. For example, the free AI art generator allows you to create beard styles that fit any face.
You no longer have to manually apply and edit elements. Instead, you can generate various beard styles adapted to the specific individual’s characteristics.
- Explore different looks
Flexibility is one of the great benefits of using AI technology. You have the freedom to try out various styles.
Examples include:
- Trimmed professional styles
- Rough-textured beard looks
- Stylish beard designs
You can blend multiple features to come up with unique looks.
- Look at the bigger picture
While beard editing is useful for personal needs, it can also be incorporated into broader artistic projects such as branding and storytelling.
For instance, the use of Dreamina’s AI logo generator can integrate stylistic beard features into brand mascots and logos, particularly for grooming and lifestyle brands.
Transforming your beard looks from shaved to stylish with Dreamina
With Dreamina, generating realistic images from your ideas becomes easy without requiring advanced techniques. All you need to do is input your descriptions, and the platform will generate the image for you.
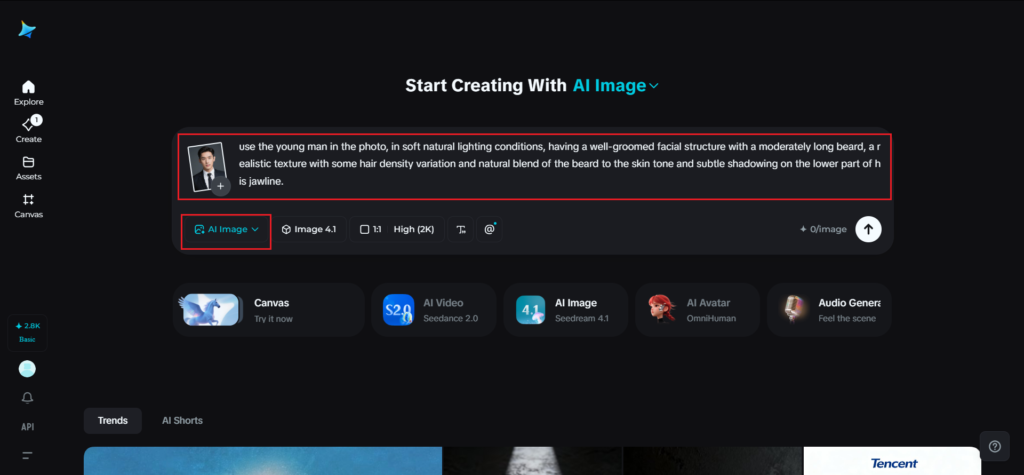
Step 1: Write the text prompt
Open Dreamina and start off by providing an elaborate description of the beard style you wish to insert. The subject used must be human and suitable for the desired effect. Add a reference image to give Dreamina better control over the visuals.
For instance, use the young man in the photo, in soft natural lighting conditions, having a well-groomed facial structure with a moderately long beard, a realistic texture with some hair density variation, and a natural blend of the beard to the skin tone and subtle shadowing on the lower part of his jawline.
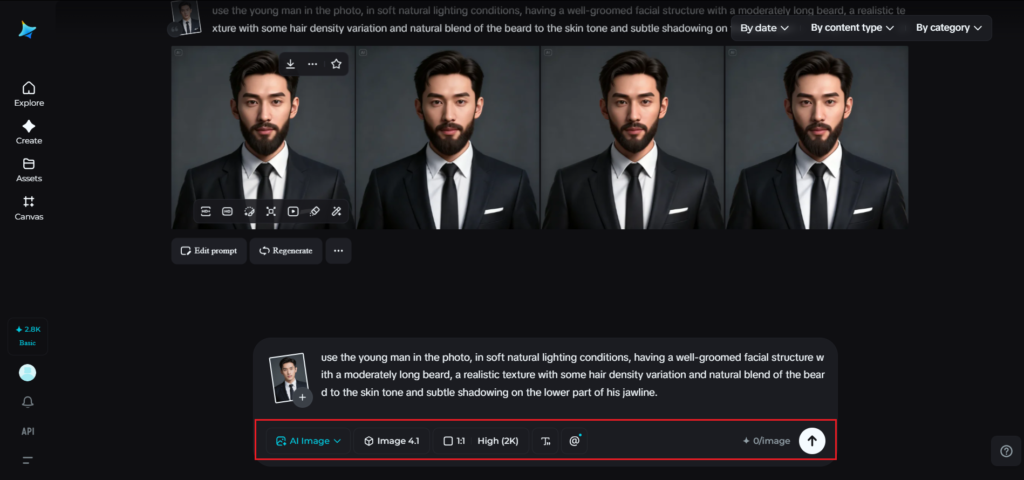
Step 2: Adjust parameter settings and create
Once you have created your text prompt, choose an appropriate model to provide quality outputs in terms of style and design. Then select an aspect ratio depending on the type of image you are creating. Choose the right size and resolution, preferably 1k or 2k to get good quality, and then hit the Dreamina icon to create your image.
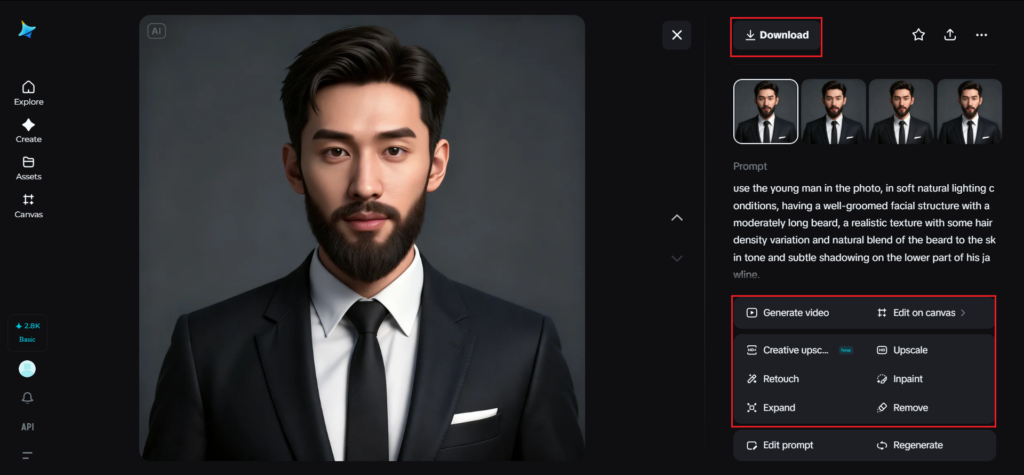
Step 3: Fine-tune and download the photo
Polish your beard edit with the tools in Dreamina. Apply inpaint to make specific modifications to the beard, expand to try out new styles, remove if you wish to remove anything, and retouch if you want to work on texture or blending. When done editing, press the Download button to download your edited photo.
Interesting ways to utilize beard edits
If you’ve made a credible beard edit, you can use it for various purposes:
- Profile picture on your social media platform
- Character concept for your creation
- Style preview before growing a beard in reality
- Visuals to advertise your brand
These examples illustrate how helpful beard edits can be.
Beard concept ideas from videos
Photos are good for inspiration, but there’s no limit to what you can do with video concepts for different types of beards. By using an AI video generator, you can produce scenes based on prompts and images that represent your beard edits in different settings.
For instance, you can make a scene of someone with the beard in their desired style, either in the studio or outdoors. Here you don’t focus on making an animated video but rather a visual one.
This method can prove very helpful if you are a creator.
Making your beard edits realistic
The secret to perfect beard editing lies in subtle changes. Tiny adjustments usually lead to more authentic outcomes.
Considerations:
- Don’t over-edit
- Don’t be too sharp
- Keep the texture of the skin the same throughout
This task will become much easier due to automation provided by the use of artificial intelligence.
Conclusion: Style Experimentation & Polishing with Dreamina
Beard editing has become accessible. It is now possible to experiment with beard styles, customize each aspect, and create perfectly realistic edits.
If you want to change your look or are working on any kind of creative project, this process will be quick and fun. You won’t be merely editing an image, but creating a style.
The right approach to editing, together with some creativity, is all you need for a perfect result!
")
")